Tag Archives: diy

DIY Acai ~ Homemade Bowl of Heaven

My first experience with acai was almost 9 years ago. I tried an acai smoothie at Hobee’s, a Bay Area restaurant where we’d often enjoy breakfast during our short stint living in Sunnyvale. It was nothing super special, as I remember, but the acai berries were shown in some studies to be richer in antioxidants than blueberries, blackberries, cranberries and other dark purple fruits, so I went with it for the alleged health benefits.

Fast forward to a couple years ago…I had an acai bowl while visiting the OC at Bowl of Heaven. It was, indeed, heaven and I couldn’t wait to find a place in the SCV where I could round up another one. Last summer I noticed Juice It Up had them and one day I treated myself to one while the kids were at VBS. Again, it was amazing, but not cheap {about $8} so I told myself it would be a definite once in awhile treat!

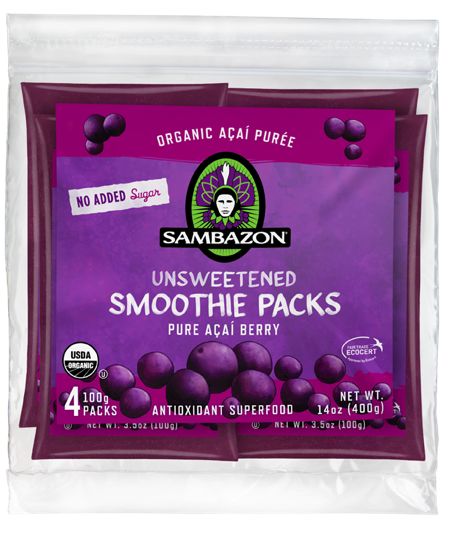
I had heard that Whole Foods sells the acai packs for homemade bowls and figured our local Sprouts would also carry them. Sure enough they do and last time I was there, I picked up a 4-pack. If I remember correctly, it was about $5 or $6. Each four pack will make 2 good size acai bowls or 4 smaller, but still satisfying, servings.

acai3

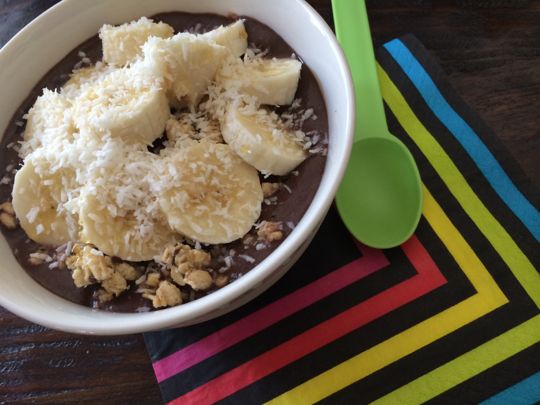
I order {The Mayan} when I go to Juice It Up and tried to recreate that at home with a couple modifications.

I used:

2 acai packs

1/2 cup chocolate soy milk

1 tbsp peanut butter

Blend that up in your blender. The texture is almost like that of frozen yogurt. If you want to make a smoothie, use 1 cup liquid instead.

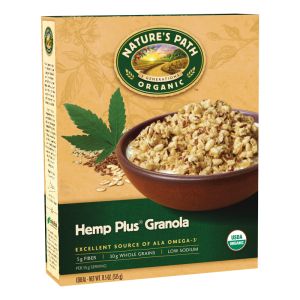
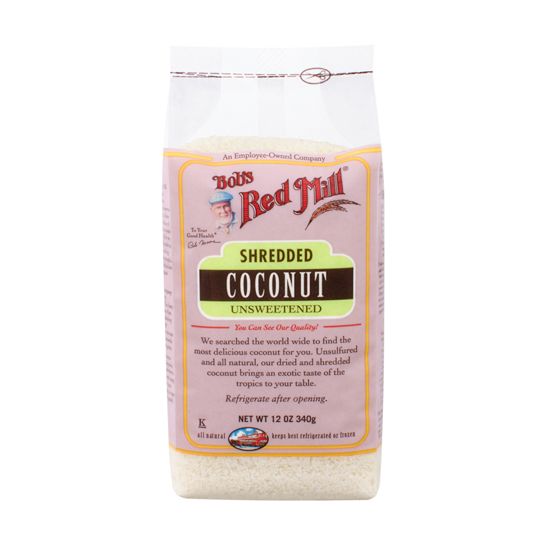
I then topped the acai mixture with half a sliced banana, some hemp granola {also from Sprouts}, a drizzle of honey and a sprinkling of unsweetened coconut {from Ralphs}.

acai2

acai4

I must say that this homemade version will most definitely take care of those cravings at a fraction of the cost.

acai1

You can most certainly change up the liquid that you blend up and play around with the toppings ~ blueberries, strawberries, kiwi, Cutie orange segments, chopped nuts and even dried fruits would be delish!

*****

I still need to blog our amazing summer vacation to NYC! Now that school is in session and I’ve had some time to get the house back in semi-order, I can hopefully sit down next week and relive our trip through a blog post. Can’t wait to share it with you.

As always, thanks for reading and we are a stone’s throw away from the weekend. Yay!

XOXO

Jumpstart To The Holidays ~ Candy Cane Vodka {Recipe}

Daily I find myself penciling things into my planner from now until the end of he year…yes, I am old skool and still write stuff down on a calendar!

With each reminder, time and date that I enter, I become more and more aware of how fast the holidays come and go. Each year I try to do better at being more organized and less stressed.

decanter1

decanter2

Last week I came across these gorgeous Threshold decanters at Target for 70% off.

Unfortunately they only had two and unfortunately they’re only sold online, but I snatched them up and thought I could fill them with homemade infused vodka for Christmas.

Enter this…..

candycanevodka-5

{via}

2 ingredients.

Easy.

Full instructions here.

I love the festive color. Going to pour it into these decanters & mason jars and pair it with a nice hot cocoa mix for a couple friends and neighbors to help with burning the holiday midnight oil.

Also going to add a recipe for this holiday martini…

Candy Cane Snowtini

{via}
Substitute “parts” for “ounces,” and this will make 1 cocktail.

2 parts Candy Cane Vodka
1 part simple syrup (equal parts sugar and water, boiled until sugar dissolves)
1/2 part heavy cream

ice

mini candy cane to hang off the rim of your martini glass

In a cocktail shaker filled with ice (or leak-proof water bottle, if you’re resourceful like me), mix Candy Cane Vodka, simple syrup and cream together. Shake vigorously for about 30 seconds.

*****

I tell you, after Halloween it’s all downhill to December 31st.

Don’t you agree?

Happy Tuesday!

XO

Put An Egg On It

Jay’s favorite Red Robin burger is the Royal Red Robin which is served with an egg atop the patty.

Personally, I prefer the Bonzai Burger….

Last Christmas my brother-in-law gave me The Meatball Shop’s cookbook. Apparently this is a hip joint where all the cool kids hang out in NYC’s Lower East Side.

Since we’re old, uncool, suburban soccer parents that live clear on the opposite corner of the country, we can still experience the hipness that is TMS in the privacy of our own cluttered, kids-running-amok environment.

I put Jay in charge of figuring out tonight’s dinner and he came across the “Steak ‘N’ Bacon Cheddar Balls” {every man’s dream!} saying that it reminded him of his precious RRR Burger…

burger1

I was a little skeptical of the egg on my burger and was going to skip it but, decided YOLO {you only live once} and gave it a shot.

It’s actually realllllly good!

Here is what you need:

3 tablespoons olive oil

1 onion, finely diced

8 ounces bacon, diced {about 1 1/2 cups}

2 pounds 80% lean ground beef

6 ounces cheddar cheese, grated

3 large eggs

1/2 cup bread crumbs

2 teaspoons salt

burger2

Here is what you do:

Preheat the oven to 450*F. Drizzle 2 tablespoons of the olive oil into a 9X13-inch baking dish and use your hand to evenly coat the entire surface. Set aside.

Heat the remaining 1 tablespoon olive oil in a large frying pan over medium-high heat. Add the onions and bacon and cook, stirring frequently, until the bacon has browned and the onions are translucent, about 10 minutes. Using a slotted spoon, transfer the onions and bacon to a plate and place in the refrigerator to cool.

Combine the ground beef, cooled bacon and onion mixture, cheddar, eggs, bread crumbs, and salt in a large mixing bowl and mix by hand until thoroughly incorporated.

Roll the mixture into round, golf ball-size meatballs {about 1 1/2 inches or 2 dozen meatballs}, making sure to pack the meat firmly. Place the balls in the prepared baking dish. {I read the directions wrong and made 12 large meatballs and roasted a little longer ~ about 25-27 minutes}

Roast for 20 minutes, or until the meatballs are firm and cooked through. A meat thermometer inserted into the center of a meatball should read 165*F.

Allow the meatballs to cool for 5 minutes before serving.

I placed one meatball sliced horizontally onto a toasted kaiser roll with some spinach on the bottom half and topped with a sunny side up egg, fresh ground pepper & Sriracha.

Served alongside was some zucchini that I tossed in olive oil, salt & pepper and some crushed red pepper and roasted at 400* for about 20-25 minutes.

burger3

*****

This is a meal that probably should not be eaten more than once or twice a year. It was fun to experiment with the egg and try another meatball recipe from this book.

Since we have 9 huge meatballs left, I think we’ll have those with a salad or some other roasted or sautéed veggies and skip the egg and bun!

I think it’s safe to say that you could file this recipe away for Father’s Day and make almost any man happy with it.

Enjoy your Veteran’s Day!

The willingness of America’s veterans to sacrifice for our country has earned them our lasting gratitude. ~ Jeff Miller

Don’t Be Without In N Out ~ DIY Double Double, Animal Style

Have you never experienced an In N Out love affair? Or know the goodness that is INO, but moved to a place where the big yellow arrow doesn’t exist?

You can replicate their famous burger in your own kitchen and you know what? It comes darn close to the real thing….almost like you were sitting in a booth wearing an INO paper hat and eating it out of the little red tray with some of their crispy, natural fries on the side.

burger2

Jay came across this recipe on Flickr and casually forwarded it to me. I immediately put it on the 3-day weekend menu plan.

Ingredients

serves two 1/4-pound burgers

  • 1/2 pound fresh beef chuck with plenty of fat, cut into 1-inch cubes {I just used 1 pound 85% ground beef. I was NOT trying to grind or process my own meat ~ read steps 1-4 below!}
  • 2 teaspoons vegetable oil, divided
  • 1 large onion, finely chopped (about 1 1/2 cups)
  • Kosher salt
  • 2 tablespoons plus 2 teaspoons mayonnaise
  • 1 tablespoon ketchup
  • 2 teaspoons sweet pickle relish
  • 1/2 teaspoon sugar
  • 1/2 teaspoon distilled white vinegar
  • 2 soft Hamburger buns, preferably Arnold brand {I used plain ol Ralphs hamburger buns}
  • Freshly ground black pepper
  • 8 dill pickles chips
  • 2 quarter-inch-thick slices ripe tomato
  • 2 leaves fresh iceberg lettuce, white core section removed, torn to bun-sized pieces
  • 1/4 cup yellow mustard
  • 4 slices deli-cut American Cheese

Procedures {Note: Instead of steps 1, 2, 3 & 4, I just used 1 pound of ground beef and formed 8 thin patties like it says in step 8}

  1. If using a meat grinder: Place feed shaft, blade, and 1/4-inch die of meat grinder in freezer until well-chilled. Meanwhile, place meat chunks on rimmed baking sheet, leaving space between each piece and place in freezer for 10 minutes until meat is firm.
  2. Combine meat in large bowl and toss to combine. Grind meat and refrigerate immediately until ready for use. Handle as gently as possible. Proceed with step three below.
  3. If using a food processor: Place bowl and blade of food processor in freezer until well-chilled. Meanwhile, place meat chunks on rimmed baking sheet, leaving space between each piece, and place in freezer for 10 minutes until meat is firm, but not frozen.
  4. Combine meat in large bowl and toss to combine. Working in two batches, place meat cubes in food processor and pulse until medium-fine grind is achieved, about 8 to 10 one-second pulses, scraping down processor bowl as necessary. Refrigerate ground meat immediately until ready for use. Handle as gently as possible.
  5. Heat 1 teaspoon oil in a 10-inch non-stick skillet over medium-high heat until shimmering. Add onions and 1/2 teaspoon salt to skillet. Reduce heat to medium low, and cook, tossing and stirring occasionally until onions are well browned, about 15 minutes. Once onions begin to sizzle heavily and appear dry, add 1 tablespoon water to skillet and stir. Continue cooking until water evaporates and onions start sizzling again. Repeat process, adding 1 tablespoon of water with each iteration until onions are meltingly soft and dark brown, about 3 times total. Transfer to a small bowl and set aside.
  6. Make the sauce: Combine mayonnaise, ketchup, relish, sugar, and vinegar in small bowl. Stir to combine.
  7. Place closed buns in preheated oven for 2 minutes until slightly darkened and crisped. Heat 1/2 teaspoon oil in 12-inch non-stick skillet or griddle over medium-high heat until shimmering. Open buns and add face-down to skillet. Toast until dark brown around the edges, about 1 minute total. {I just lightly toasted the buns}
  8. Form ground beef into four 2-ounce patties, using damp hands to press each into a patty about 3/16ths of an inch thick and 4 inches wide. Season generously with salt and pepper. Add remaining 1/2 teaspoon oil to pan, swirl to coat, and heat over medium-high heat until lightly smoking. Add burger patties and cook without moving until well browned and crusty on first side, about 2 1/2 minutes. While they are cooking, spread 1 tablespoon mustard on raw side of each patty with a spoon. Meanwhile, top each bottom bun with up half of spread, 4 slices pickles, 1 slice tomato, and lettuce. Flip patties with a thin spatula so mustard side is down and continue to cook for 1 minute. Top each patty with a slice of cheese. Divide onion mixture evenly between two patties. Place the other two patties directly on top of the onions, sandwiching them between the beef. Transfer patty stacks to bottom bun. Top with top bun, and serve immediately.

burger1

I have to say that it came real close to the real thing…my bun got all gooey from the sauce and I had tomato and grilled onions falling all over the place!

I roasted up some sweet potato slices to go with.

The only time consuming part was maybe caramelizing the onions ~ took about 20 minutes.

This recipe certainly won’t stop us from going to In N Out, but it was fun to try and see how they compared to everyone’s favorite burger.

Enjoy!

burger4

*****

And we certainly can’t forget this picture from under the criss-crossed palm trees…

burger3

{Kapri & Holden ~ October ’12}

Torture

I am writing this post merely to help pass the time until I can put the second coat of chalkboard paint on my soon-to-be MENU.

{after first coat}

I’m tryyyying to be a patient crafter and wait the recommended 4 hours between coats, but the reality of the situation is that I want the last coat to be dry, the tape off, the chalkboard conditioned, a sweet sentiment sprawled across it and hung on the wall.

Torture, I tell you.

This is the look that I am trying to achieve….

{via}

I am loving the gold, ornate frame around a black chalkboard these days…

*****

Once this baby is all complete, I will let you know all the steps needed to whip up one of these beauties at home.

So far, so good. Pretty easy.

It’s the waiting that’s KILLING me.

Coffee Monday

This weekend I took the time to rethink the homemade Pumpkin Spice Latte and, based on this recipe, I think I found the method and ingredients that work for me.

I hope you’ll enjoy it, too!

The first time I attempted this, I used 1 cup of coconut almond milk for the pumpkin mixture. I LOVE this stuff, but for some reason my coffee wasn’t creamy enough…I make our coffee strong and like it on the lighter brown side once I add my creamer. With the coconut almond milk in the pumpkin mixture, it was still way too dark and I didn’t particularly care for the flavor. {I will continue to use the coconut almond milk in my smoothies and on cereal/oatmeal, however, just not in my coffee}

: Perfected {in my opinion} DIY Pumpkin Spice Latte :

1 cup whole or 2% milk {I used whole since that’s all we had on hand}

1/4 cup pumpkin puree

Couple dashes of pumpkin pie spice

Mix until blended and heat slightly in the microwave. Add 1 tbsp brown sugar to the bottom of a mug and fill with freshly brewed coffee. Top with half the warmed pumpkin milk mixture and add whip cream and cinnamon for a special treat!

Makes 2 servings.

This won’t be something that I do every morning, but is a nice addition to a slow-moving autumn weekend morning.

*****

Annnnnd, since we are not quite experiencing the Fall temps here in So Cal yet, here is an easy iced version for an afternoon pick-me-up and a great way to use leftover coffee.

{just place your extra coffee from the morning in the fridge so it’s nice and cold when you need it}

: Pumpkin Hazelnut Iced Coffee :

Heaping tbsp pumpkin puree

Splash milk

Splash hazelnut creamer

Leftover cold coffee from your fridge

Lots of ice

Whisk pumpkin, milk and creamer together in a small mug or bowl. It may seem a little thick, but will be fine once you add the coffee and ice. Fill tall glass with ice, pour in pumpkin hazelnut creamer and then fill with iced coffee to the top of the glass. Stir well and sweeten, if needed. I just used the whipped cream as my sweetener! Don’t forget to add a little sprinkle of pumpkin pie spice or cinnamon to your whipped cream.

It is Monday, so turn it around and make a hot or iced version of this Fall fave.

Enjoy!

XO

One Man’s Trash….

…is another {wo}man’s treasure!

Today is trash day in our neighborhood.

While walking to school, I spotted a cute little two-drawer table out on the curb with my name on it.

I saw the homeowner getting her little ones ready to walk to school too and after we both got our kindergartners safely off, I put my pride aside and asked, “Was that cute little table out in front of your house for the trash man?”

She said “Yes! Please take it!” and I literally carried the thing home a quarter of a mile.

Jay’s gonna kill me.

I’ve been wanting something this size for our room as a little vanity of sorts.

We have a gorgeous big mirror that I’ve been wanting to put up, but don’t want to put two huge holes in the wall. Now I can just prop the mirror up on this table.

I am seeing some vintage crystal pulls in this little lady’s near future….

not sure what color I will paint her, but I am so excited!

*****

Hope your Friday is full of a good find….or two!