Daily I find myself penciling things into my planner from now until the end of he year…yes, I am old skool and still write stuff down on a calendar!
With each reminder, time and date that I enter, I become more and more aware of how fast the holidays come and go. Each year I try to do better at being more organized and less stressed.
Unfortunately they only had two and unfortunately they’re only sold online, but I snatched them up and thought I could fill them with homemade infused vodka for Christmas.
I love the festive color. Going to pour it into these decanters & mason jars and pair it with a nice hot cocoa mix for a couple friends and neighbors to help with burning the holiday midnight oil.
Also going to add a recipe for this holiday martini…
Candy Cane Snowtini
{via}
Substitute “parts” for “ounces,” and this will make 1 cocktail.
2 parts Candy Cane Vodka
1 part simple syrup (equal parts sugar and water, boiled until sugar dissolves)
1/2 part heavy cream
ice
mini candy cane to hang off the rim of your martini glass
In a cocktail shaker filled with ice (or leak-proof water bottle, if you’re resourceful like me), mix Candy Cane Vodka, simple syrup and cream together. Shake vigorously for about 30 seconds.
*****
I tell you, after Halloween it’s all downhill to December 31st.
Jay’s favorite Red Robin burger is the Royal Red Robin which is served with an egg atop the patty.
Personally, I prefer the Bonzai Burger….
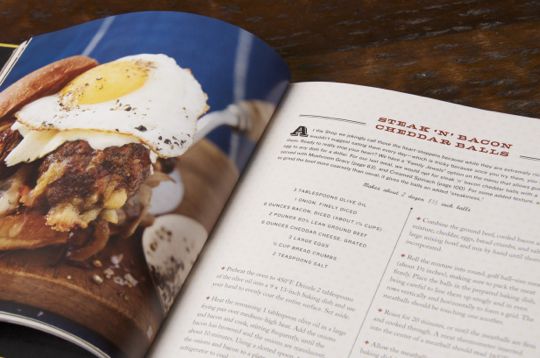
Last Christmas my brother-in-law gave me The Meatball Shop’s cookbook. Apparently this is a hip joint where all the cool kids hang out in NYC’s Lower East Side.
Since we’re old, uncool, suburban soccer parents that live clear on the opposite corner of the country, we can still experience the hipness that is TMS in the privacy of our own cluttered, kids-running-amok environment.
I put Jay in charge of figuring out tonight’s dinner and he came across the “Steak ‘N’ Bacon Cheddar Balls” {every man’s dream!} saying that it reminded him of his precious RRR Burger…
I was a little skeptical of the egg on my burger and was going to skip it but, decided YOLO {you only live once} and gave it a shot.
It’s actually realllllly good!
Here is what you need:
3 tablespoons olive oil
1 onion, finely diced
8 ounces bacon, diced {about 1 1/2 cups}
2 pounds 80% lean ground beef
6 ounces cheddar cheese, grated
3 large eggs
1/2 cup bread crumbs
2 teaspoons salt
Here is what you do:
Preheat the oven to 450*F. Drizzle 2 tablespoons of the olive oil into a 9X13-inch baking dish and use your hand to evenly coat the entire surface. Set aside.
Heat the remaining 1 tablespoon olive oil in a large frying pan over medium-high heat. Add the onions and bacon and cook, stirring frequently, until the bacon has browned and the onions are translucent, about 10 minutes. Using a slotted spoon, transfer the onions and bacon to a plate and place in the refrigerator to cool.
Combine the ground beef, cooled bacon and onion mixture, cheddar, eggs, bread crumbs, and salt in a large mixing bowl and mix by hand until thoroughly incorporated.
Roll the mixture into round, golf ball-size meatballs {about 1 1/2 inches or 2 dozen meatballs}, making sure to pack the meat firmly. Place the balls in the prepared baking dish. {I read the directions wrong and made 12 large meatballs and roasted a little longer ~ about 25-27 minutes}
Roast for 20 minutes, or until the meatballs are firm and cooked through. A meat thermometer inserted into the center of a meatball should read 165*F.
Allow the meatballs to cool for 5 minutes before serving.
I placed one meatball sliced horizontally onto a toasted kaiser roll with some spinach on the bottom half and topped with a sunny side up egg, fresh ground pepper & Sriracha.
Served alongside was some zucchini that I tossed in olive oil, salt & pepper and some crushed red pepper and roasted at 400* for about 20-25 minutes.
*****
This is a meal that probably should not be eaten more than once or twice a year. It was fun to experiment with the egg and try another meatball recipe from this book.
Since we have 9 huge meatballs left, I think we’ll have those with a salad or some other roasted or sautéed veggies and skip the egg and bun!
I think it’s safe to say that you could file this recipe away for Father’s Day and make almost any man happy with it.
Enjoy your Veteran’s Day!
The willingness of America’s veterans to sacrifice for our country has earned them our lasting gratitude. ~ Jeff Miller
Seems like I’m just popping in again real quick to share a fun little recipe with you. It looks like that’s my M.O. lately….say Hello and remind you I’m here with a token post and some good food.
Yesterday was busy ~ we had church class and soccer simultaneously and that meant Elliott skipping out just this once on CCD and going to her 4:00 soccer practice. So it was drop off Holden at church, take Elliott to practice, run into Ralphs {and forget 2 items}, go pick up Holden at church, go back down to pick up Elliott, start dinner, call Jay to retrieve 2 forgotten items at the store, snap pictures of Holden’s class Terrific Tiger to document his {boring} evening with us, come to realize that Terrific Tiger should probably be thrown into the wash {aka given a bath} and spritzed with antimicrobial Febreeze before going into bed with Holden, blah. blah, blah.
However, amongst all this stuffed animal chaos and documentation for the class journal, I was excited about dinner because my IG friend, Elizabeth, posted some Baked Tacos earlier in the day. We had a box of taco shells in the pantry and a pound of ground turkey thawed ~ perfect!
Guys…..these are awesome! They kiiiinda remind me of the Jack in the Box tacos {which I haven’t had in a million years} that are a little softer at the bottom, but they are made with real, legitimate meat and equally as delish.
We had them last night and again tonight!
This is the recipe I followed. I just Googled {Baked Tacos} and went to the first one that popped up. The lineup sounded good {except that I had to have Jay stop for black beans} so I decided to go with this one.
Super easy…just sauté half an onion and a couple minced cloves of garlic. Add ground meat of choice {I used 1 pound ground turkey} and brown. Add a package of taco seasoning and a little water and let simmer on low for a bit. Drain and rinse a can of black beans and add to the meat along with a small jar of salsa {I used peach/pineapple and didn’t quite use the whole jar}. Preheat your oven to 400* and line up an oven safe dish with taco shells {I used foil tonight for easier clean up}. Fill shells with meat mixture and top with a little shredded cheese. Place into preheated oven for 6-8 minutes or until cheese is melted. Remove and top with your favorite taco fixins {we used light sour cream, shredded lettuce and chopped tomato}. I added a slice of ripe avocado this evening and they were out of this world!
Just a fun twist for your average taco night.
They were most definitely missing some Cholula, but we were fresh out.
Next time.
Note: you will need a fork to scoop up all the good stuff that spills out onto your plate.
*****
I hope you enjoy these as much as we did.
Hoping to come out of hibernation now that the holidays are FAST approaching. This is my most favorite time of the year and I have a lot that I want to share so {fingers crossed} I will make time to blog more.
I really do miss it and just need to get my priorities straight…..
Easier said than done, right.
Happy Friday!
We have early morning soccer, another birthday party tomorrow afternoon and then hopefully hit a few of the bigger coasters at Magic Mountain after church with our new season passes.
In October of 2005, Jay and I put our little 1936 Craftsman home in San Diego on the market and headed to Nor Cal with a 6-month old Elliott and Riggs & Rascal. For 6 months we lived in a little one-bedroom apartment in Sunnyvale while our home was being built. I remember begging the salesperson to get us into a home that was already built so we wouldn’t have to live in this OLD apartment complex {it was the only place that allowed our two dogs}, but this was at the height of the market and we had to indeed wait several months for the home to be finished…there were no houses that fell out of escrow.
We literally knew NOBODY when we moved there. Jay’s cousins lived nearby, and that was great for weekend get togethers, but during the week I literally watched Food Network, did laundry and grocery shopped day in and day out. All our belongings were in storage and we went to IKEA and got two comfy black chairs and a tiny 13″ television/DVD player at Costco. I’d sit and watch the FN line-up and decided to invest in a Rachael Ray cookbook. I’d flip through the cookbook and find something that sounded good or take notes from an episode and Google the recipe. I would go to the grocery store almost daily and get fresh ingredients for our dinners. The bottom of Elliott’s stroller was just big enough to fit everything we needed for one night’s cooking.
Elliott would sit in her swing and I would prepare dinner for Jay and me. This is when I developed my love of cooking and baking. I’d always envisioned myself as the “entertaining” type, but worked FT, had a commute that got me home later than Jay and didn’t seem to have the time or energy to fix a nice meal. BUT, in this teeny little galley kitchen, I learned to LOVE to cook. We didn’t even have a table and if I remember correctly, we’d sit in our IKEA chairs and balance our plates on our laps! Classy.
*****
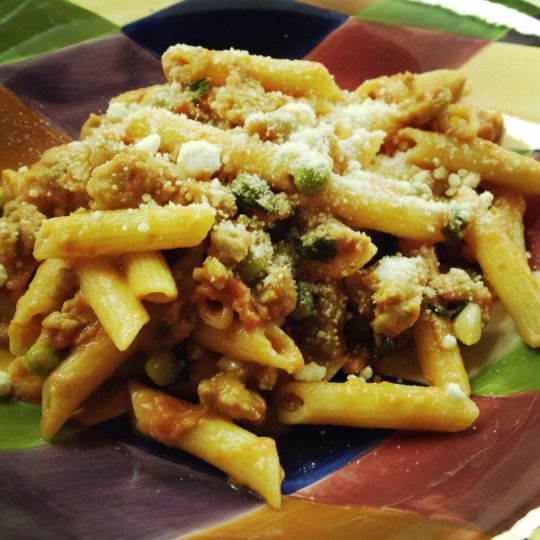
This past Sunday night a group of mamas got together to visit and pray for our friend, Angela, who is having surgery today. We started talking about a pasta dish that sounded amazing and I asked for the recipe. Turns out it’s called Peasant Pasta and is a Rachael Ray recipe.
As I was walking the aisles of Ralphs yesterday gathering ingredients for this pasta, I couldn’t help but go back to the slower, simpler days when being a stay-at-home mama was new and maybe a bit lonely at times. Now that we’ve put down roots back in So Cal while establishing many wonderful friendships and with our days being so full and watching the weeks fly by, it’s hard to imagine the quieter, carefree days.
Now that I look back, those days in that little apartment were beautiful, too. I love when a recipe can bring back such memories….
Thank you, Lillian, for sharing!
XOXO
*****
Ingredients
1 tablespoon extra-virgin olive oil, 1 turn of the pan
1/2 pound hot Italian sausage, available in bulk at butcher counter or, 2 links, casings removed
1 pound sweet Italian sausage, available in bulk at butcher counter or, 4 links, casings removed
3 to 4 cloves garlic, chopped, optional {I used about 10!!}
1/2 cup chicken or vegetable broth
1 (28-ounce) can crushed tomatoes
1/2 cup heavy cream
Salt and freshly ground black pepper
1 cup frozen green peas {I used petite peas}
24 leaves fresh basil, torn or thinly sliced
1 pound penne rigate pasta, cooked to al dente
Grated Italian cheese, for passing
Directions
Heat a large, deep skillet over medium high heat. Add extra-virgin olive oil, 1 turn of the pan. Add sausage meat. Crumble sausage meat as it browns. Add chopped garlic to the pan. When all of the crumbles have browned evenly, deglaze the pan drippings using chicken or vegetable broth. Stir in crushed tomatoes and bring the sauce up to a bubble, then reduce the heat to a simmer. Stir cream into your sauce, this will blush the color and cut the acidity of the tomatoes. Season with salt and pepper. Stir peas and basil into your sauce to combine. Toss hot drained penne rigate in pan with the sauce, then transfer pasta to serving bowl.
Even without the sweet memories attached to this meal, it was DELISH and will definitely be a frequent contender in menu planning.
This recipe makes a lot so it would be great for entertaining a larger group and even doubling it would be easy, too.
Looks like I’m popping in once again to drop a little recipe post and run…
I miss blogging and have so much to catch up on, but just don’t have the time I like to devote to writing my longer posts right now.
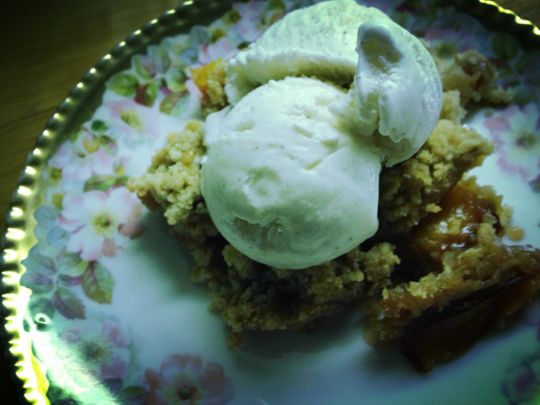
Last night I threw together a little Peach Crisp with some over-ripe peaches that sat out over the long weekend while we were enjoying a trip to San Diego.
I ended up using this recipe, but left out the raisins and almonds.
Ingredients
For the filling:
5 large ripe peaches, pitted and cut into chunks
1 lemon, zested and juiced
3 tablespoons all-purpose flour
1/4 cup tightly packed brown sugar
2 tablespoons sugar
1/2 teaspoon vanilla extract
1/2 cup golden raisins
Pinch kosher salt
For the topping:
1 1/4 cups all-purpose flour
1/2 cup rolled oats
1/2 cup brown sugar
1/2 cup sugar
1 1/4 stick cold unsalted butter, cut into pea sized pieces
1/2 cup sliced almonds
Pinch kosher salt
1 to 2 tablespoons cold water
Special equipment: 6 (6-ounce) ramekins {I used an 8″X8″ baking dish}
Directions
Preheat the oven to 350 degrees F.
For the filling:
Toss the peaches in a large bowl with the zest and lemon juice. Add the rest of the ingredients and stir to combine. Divide the filling evenly between the ramekins.
For the topping:
Combine all of the ingredients in a food processor except the water. Pulse until combined, this will take about 30 seconds. Add water, 1 tablespoon at a time until mixture is clumpy but crumbly.
Top each ramekin with the topping. Be sure to loosely sprinkle the topping and not pack it down. The idea is to look very crumbly and craggy.
Place the ramekins on a sheet tray and bake in the preheated oven for 20 to 25 minutes, or until the filling is hot and bubbly and the topping, brown and crispy.
Note: This is great served hot with vanilla ice cream
You know what I loved most about this recipe? There was a lot more crumble topping than I’m used to. That is my favorite part….confession, when we go to Souplantation and they serve the warm apple crisp, I scrape the streusel topping off and then top that with vanilla soft serve. Hopefully the person that comes after me likes the warm apples better!
I love the addition of lemon zest and juice to this recipe. Normally I’d think some cinnamon or a little nutmeg would go into something like this, but the zest really brightened it up and didn’t leave it too sweet.
Cannot wait to get the kiddos in bed this evening, dish up another serving of this and watch the So You Think You Can Dance finale!
You do you like?
I’m rooting for Aaron. It’s about time a tapper won this thing.
*****
Hope your Labor Day was perfect and that you’re ready to welcome Fall….my most favorite season of all.
“Autumn…the year’s last, loveliest smile.” ~ William Cullen Bryant
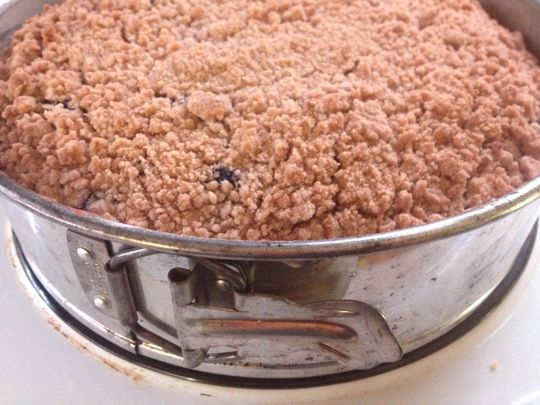
Since I can’t get my act together to do a recap of our trip to the Carolinas, I’ll share with you a dessert I made while on vacation for my sweet in-laws to celebrate their July birthdays…
It’s like a coffee cake, but not too sweet, super moist and bursting with blueberries…
I love anything with a crumble top, but add vanilla ice cream and I’m sold….
I made this earlier in the day and it had cooled by the time we were going to enjoy it. I can’t emphasize this enough, but you NEED to eat this warm or heat in the microwave slightly before shoving it in your face. 😉
Some homemade whipped cream would also be lovely atop a slice of this, but I didn’t need to tell you that.
Hurry! Grab a few cartons of blueberries before the summer is over and bake one for your family, friends or co-workers.
Make a Blueberry Buckle, brew a pot of coffee and invite some mamas over on the first day of school to mourn/celebrate your freedom!
I’d be doing the latter….I love my munchkins, but I’m more than ready to get back in some sort of routine.
Today is a perfect June Gloom-y Monday. No pressure to get out to the pool or the park, just temps in the low 70s and a work-around-the-house kind of day. I’m enjoying it because before too long, it’s going to really heat up around here.
Elliott spent the morning at Cooking Camp while Holden and I {ok, just me} whizzed through the house filling trash bags, getting piles ready to donate, vacuuming and throwing a couple loads of laundry in.
Feels so good to just get rid of STUFF. Ugh! So. Over. It.
On this wonderfully overcast and cool day, it only seemed fitting to light a candle ~ this has been my favorite to burn lately and sends off and ever so slight tropical scent making you think wish you were on an island far, far away sucking down a daiquiri with sand between your toes…
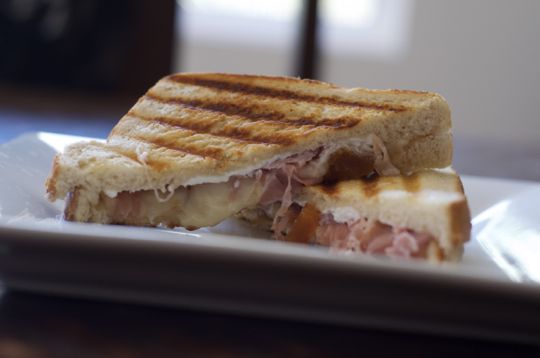
Also, I think a nice warm grilled cheese fits the bill for lunch on a day like today.
I have a whole board on Pinterest just for grilled cheeses. I’ve yet to try any of them, but when I saw this one on IG, well….I couldn’t stop thinking about it.
Thanks, Cameron, for sharing! It was amazing…..duh.
What you need:
Loaf of sourdough bread
Slices of provolone cheese
Log of goat cheese {or already crumbled. I used plain, but an herbed one would be even more delish}
Prosciutto
Jam of choice {I used homemade peach, but strawberry, fig, apricot or blackberry would be fantastic}
Softened butter
What you do:
Lightly butter two slices of bread. Flip them over and spread some jam on both slices. Add crumbled goat cheese to one slice and a couple thin slices of provolone to the other. Lay some prosciutto {I used 2 slices} on top of the cheeses and make into a sandwich. Place buttered side down onto a pre-heated grill pan or panini press. Flip after a couple minutes or cook as your panini press directs.
Slice diagonally and ENJOY!
It’s crispy, gooey, sweet & salty!
This sandwich will be your sunshine on a cloudy day.
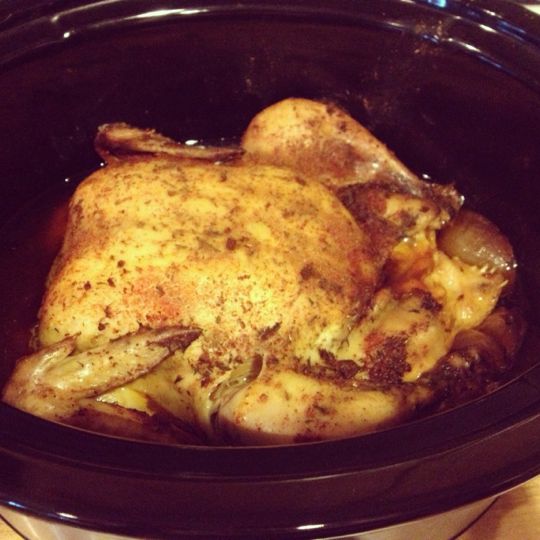
I figured it’d be almost like a rotisserie chicken, which we love, so figured I’d give it a shot…
Mix up the dry rub:
2 teaspoons paprika
1 teaspoon salt
1 teaspoon onion powder
1 teaspoon thyme
½ teaspoon garlic powder
¼ teaspoon cayenne (red) pepper
¼ teaspoon black pepper
Now comes the not so fun part…prepping the chicken. It’s easy, but not my fave. Remove the giblets from the cavity and discard. Rinse chicken well and pat dry with a few paper towels.
Roughly chop one whole onion and place it on the bottom of your crock pot.
Place the whole chicken on top of the onion and rub the spice mixture all over ~ even under the skin if you like.
DO NOT ADD ANY WATER OR LIQUID!!
The chicken will create all the liquid it needs and be plenty moist.
I always like to cook things on low in my crock pot so I recommend about 6 hours on low, but the original recipe says 4-5 hours on high. I’ve made this twice and both times I’ve done 6 hours on low and it’s been perfect.
The meat literally comes right off the bone and is suuuper moist and tender.
Elliott automatically gets both drumsticks. We usually get 2 or three meals out of it. I’ll slice the breast meat for a salad or Holden will eat it along with his mac n cheese. I remove the rest of the meat and use it for chicken tacos, chicken salad or whatever.
This 4-day weekend {kids had a furlough day on Friday and Jay took it off} we decided to stick close to home and not make any major plans since the past few weekends have been beautifully busy. We also made an agreement not to eat out at all.
That’s a biggie.
We enjoy eating out a little on the weekends whether it be trying out a new restaurant or revisiting one of our old favorites.
So, I did a Trader Joe’s and Vons run and stocked up on fruits, veggies, meats, etc.
I do love to cook and bake, but with 12 meals over the long weekend, that means a lot of messes and a LOT of dishes!
BUT, we did save a lot of money and enjoyed later, leisurely dinners as a result.
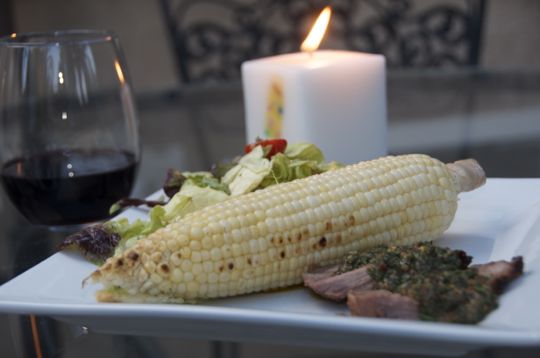
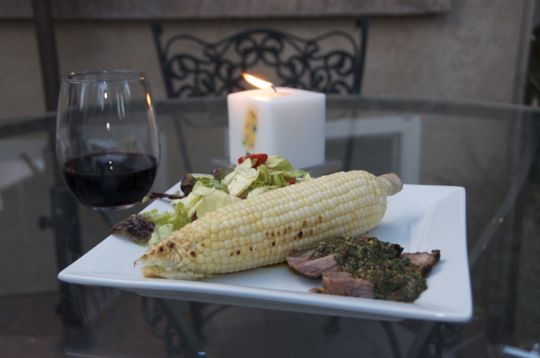
Tonight we tried a recipe that Jay spotted in the June issue of Sunset magazine ~ STEAK a la PLANCHA.
I’d never had chimichurri, but have always wanted to try it. I found a beautiful tri tip and Jay got that marinating yesterday overnight for grilling this evening.
1 bison or beef tri-tip 1.5″-1.75″ thick and about 2 pounds, trimmed of fat {we stuck with beef}
3/4 cup olive oil
Juice of 1/2 lemon
1 tbsp. granulated garlic or garlic powder
1 tbsp. freshly cracked pepper
1 1/2 tsp. sea salt
1. Combine tri-tip with oil and seasonings in a 1-gallon resealable plastic bag. Chill about 24 hours.
2. Take bag from refrigerator about 1 hour before cooking. Meanwhile, set a cast-iron griddle or large cast-iron skillet on a grill and heat grill to high {450*to 550*}. Jay just used our Weber charcoal grill.
3. Lay tri-tip on hot griddle. Cover grill and cook, turning once or twice, until meat is deep brown and an instant-read thermometer reaches 130*{medium-rare; don’t overcook}, 15-20 minutes total.
4. Transfer tri-tip to a board, tent with foil, and let rest for 10 minutes. Slice across the grain and serve with chimichurri.
Chimichurri
In a food processor, pulse 2 tbsp. balsamic vinegar, 1/2 cup packed parsley sprigs {I used Italian/flat leaf parsley}, 7 garlic cloves {I used about 12-14}, 1/3 cup packed fresh rosemary leaves, 2 tbsp. fresh oregano leaves, 1 tbsp. lemon juice, and 1 1/2 tsp. each red chile flakes and sea salt to coarsely chop. While pulsing, pour in 2/3 cup EVOO. Let sauce rest at least 1 hour; or chill up to 3 days, then bring to room temp.
This meal was perfection. The spicy, fresh flavor of the sauce is so different. I loved the extra garlic!!
We’ll be enjoying the rest as leftovers and lunches this week and will definitely be making this again ~ possibly with flank steak next time.
***
I can’t get enough sweet white corn at this time of year.
While I was choosing my ears of corn, a nice little older woman told me to look for smaller kernels that are in a straight line for your best corn experience. Just pull down the husk and check it out in the store…I suggest leaving the husks on if you’re going to grill. Be sure and soak them in water first and grill for 15 minutes, turning along the way ~ that’s it! Oh, and mark my words, you’re going to want to drizzle a little chimichurri sauce on your corn. Yup.
I call this the K.I.S.S. salad. Keep It Simple Salad. I am always trying to add so many ingredients into our salads that sometimes I get stressed out and we may not even have a salad! This was a sample at Trader Joe’s…sweet butter lettuce, halved grape tomatoes and their Hummus dressing. That’s it. The hummus dressing is amazing and can be found in the produce section with all the other refrigerated dressings. {Elliott even liked it!}
Part of our big grocery shopping trip was a HUGE container of strawberries. I cut several up, added just a little sugar and let them macerate overnight, made biscuits {just good ol Bisquick} and had rustic strawberry shortcakes for dessert tonight, too!
Talk about summer on a plate…
We may have not gone out of town this weekend, but we ate GOOD!
Eating IN certainly does have it’s benefits ~ it’s a lot less expensive and you can control what you put into your food and how much you eat.
We’re going to try to keep this up until Father’s Day ~ Sunday, June 16th.
*****
Tomorrow we’re meeting some friends at the park and then having a little Memorial Day get together on our block. Not sure what dish I’m bringing yet, but I am going to throw together some red, white & blue sangria ~ 2 bottles Chardonnay, 1-liter Fresca {or ginger ale or lemon lime soda}, 1/2 cup triple sec, strawberries, white peaches or nectarines {if available} and blueberries.
I hope you all have a blessed day and remember our {fAllEn HeRoEs} as you celebrate with friends and family.
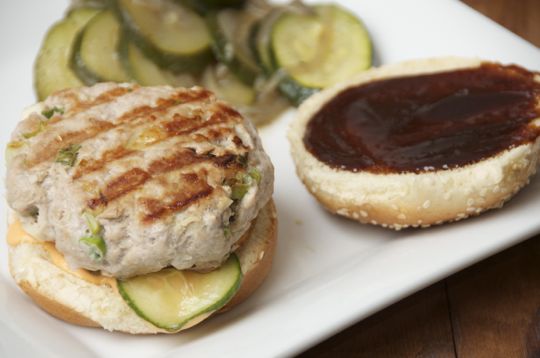
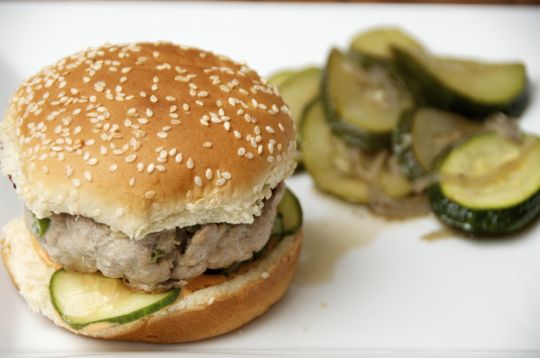
I love trying out new burger recipes with different flairs.
Jay found this version in Men’s Health and it reminded me so much of our favorite Banh Mi sandwiches, but in burger form.
Spicy Asian Pork Burgers
What you’ll need:
½ English cucumber
½ cup rice wine vinegar {I like “seasoned” rice vinegar}
Salt to taste
1 lb ground pork
2 cloves garlic, minced
1 Tbsp fresh ginger, minced
2 scallions, thinly sliced
2 Tbsp mayonnaise
1 Tbsp sriracha
4 sesame-seed buns, lightly toasted
¼ cup hoisin sauce
How to make it:
1. Make the pickles by combining the cucumber, vinegar, and a few pinches of salt in a bowl or jar. Set aside.
2. Preheat the grill over medium heat. Combine the pork, garlic, ginger, and scallions. Gently shape into patties, season with salt, and grill for about 5 minutes on each side.
3. Combine the mayonnaise and sriracha and spread on the bottom buns. Spread the top buns with hoisin and then sandwich the two halves around the burger with pickles. Makes 4 burgers.
They were delish, of course.
Spicy from the Sriracha mayo, sweet from the hoisin and crunchy & tangy from the pickled cucumbers!
I served them with sautéed zucchini and red onion in about a tablespoon of coconut oil ~ my new fave.
*****
Grab the ingredients and grill up some of these this weekend!