Category Archives: Food

Mud Run Eve Eats ~ Tequila Lime Chicken Pasta

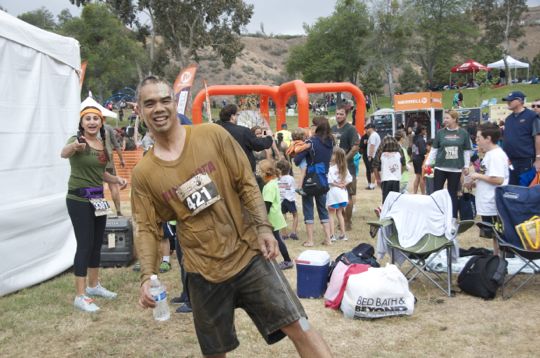
Jay signed up for the Merrell Down & Dirty Mud Run again this year ~ his third year in a row.

It’s a lot of fun to be a spectator as well as participate…I partook last year and it was quite the comedy. You can check that out here.

Jay requested a nice pasta meal the night before the 10K and, of course, I was quick to say, “Sure!”. He decided on Tequila Lime Chicken Fettuccini ~ a fabulous choice, I thought.

Cilantro? Jalapeños? Tequila? Lime?

Absolutely.

tequilalime

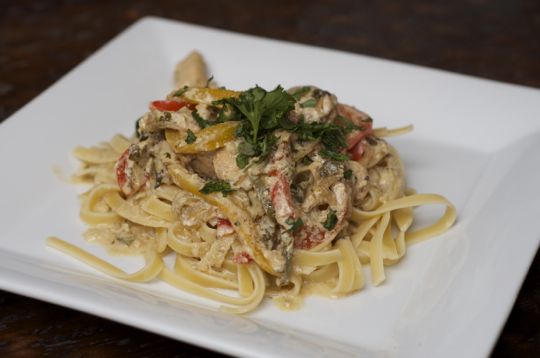
I followed the recipe precisely, however, subbed half & half for the heavy cream to feel a little bit less guilty. Also, wasn’t too sure about the soy sauce ingredient since this isn’t an Asian dish, but decided to roll with it. I didn’t think it took away from the tequila lime flavor at all, though.

We both thoroughly enjoyed it. Personally, I thought it needed more heat. Next time I think I will use 2 fresh jalapenos and leave the seeds and the ribs in since that is where all the heat is {this time I only used one and took out most of the seeds and innards}.

We were up bright and early to report for duty at Lake Castaic!

Jay did awesome and watching from the sidelines this year made me want to set a goal to do it again next year….

mud1

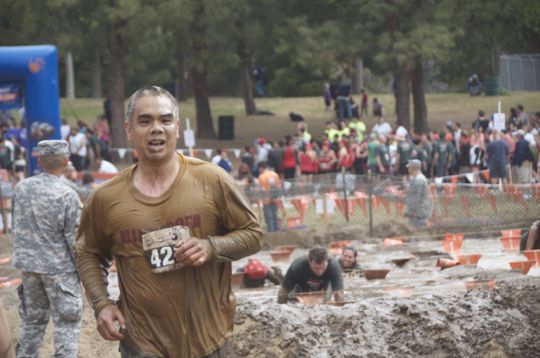
With his dog tag medal….

mud2

*****

So, I guess I am half way committing to doing the 5K again next year.

I’d like to get a team together and make a party out of it. Anyone interested?

Definitely going to need to {train} better and tackle some bigger hills leading up to the race, but mostly it’s a novelty event and just getting out there and getting dirty is what it’s all about!

Hope you all had a wonderful weekend.

XO

Get On The Train

A friend, and mama of one cute little red-headed, freckled boy in Holden’s class, welcomed a third sweet boy named Rowen on April 1st ~ no foolin’. Almost immediately, another friend spearheaded a Meal Train to come down the track and deliver meals to little Rowen’s family. I immediately jumped on board and signed up for a dinner date. I absolutely love bringing a home cooked meal to new parents who essentially need tooth picks to keep their eyes open during the first daysweeks…months with a newborn under their roof.

As I mentioned in an earlier post, Mexican Lasagna is the dish that I’ve coined as my {dinner after baby} meal. It’s one of those dishes that just as good, if not better, a day or two later.

Normally I bake it and deliver it hot and ready to serve, but this time I decided to grab a disposable pan, assemble it and add a little note for how to heat & serve it just in case they didn’t want it immediately or something else came up.

They also have two little guys {a kindergartner and a preschooler} that like pasta {when you create a Meal Train profile, it gives you the opportunity to tailor it to the recipients likes/dislikes}. I decided to just do a simple Annie’s white cheddar shells and carrot sticks with Ranch for the boys. I picked up a couple tossable plastic containers and included a Capri Sun and a CLIF fruit twist for dessert. I also tied a couple Army parachuters to the top of their individual plastic containers to make it extra special for both big brothers.

mealtrain2

I included a caesar salad kit, some sparkling lemonade, paper plates, napkins and a couple treats for baby.

And what is dinner without a little something sweet afterwards? Yesterday I whipped up a batch of my all time favorite Sugar Cookie Bars…with baby blue cream cheese buttercream, of course!

mealtrain1

*****

Meal Train is a great way to orchestrate meal delivery for a variety of different reasons. It’s extremely easy to log on and select a date to deliver a meal to appreciative recipients.

It’s been awhile since we’ve been able to deliver a meal to a family with a new baby! It was so much fun to put this together and deliver it to their doorstep this afternoon.

I will never forget the kindness and thoughtfulness WE received after Elliott & Holden were born. Sweet friends bearing meals and gifts in those first days after coming home from the hospital are so vivid in my memory and were so very much appreciated.

It is just as much a joy to be on the giving end.

Cannot wait to meet you, little Rowen Samuel!

XOXO

Guilt-free Buffalo “Chicken”

If you know me by now, you know that I will try anything {buffalo chicken}.

Buffalo Chicken brownies?

Buff Chix Smoothie?

Chocolate chip cookies?

I kid, but you catch my drift.

What I am NOT kidding about are these Spicy Buffalo Cauliflower “Wings” which were probably first pinned from PETA’s website here.

wings2

I chose to follow skinnytaste.com’s version here with my own teeny tiny twist.

I followed Gina’s directions to a “t”, but used about 1 tsp. unsalted butter and 2 tsp. coconut oil instead of 1 tbsp. butter. I am just now getting around to jumping on the coconut oil bandwagon…can you believe it? If you know be my now, you also know that I love all things coconut.

wings3

Um, these were amazing. I could’ve eaten the whole pan. To be honest, you don’t even need to dip them in ranch or blue cheese. They are perfect alone.

I didn’t have any celery on-hand so I served with some cucumber slices and just a tad bit of ranch.

Oh, and this is the only buffalo sauce that I use…

wings1

wings4

*****

Once in awhile I love to go to Hooter’s or Chili’s for boneless buffalo wings and an ice cold beer. These cauliflower bites just might take away the craving and are certainly more guilt-free ~ both in my eyes and in PETA’s eyes.

If you, too, love all things buff chix, you MUST give these a try.

Linking up again with sweet Jess and her monthly PinterTest Kitchen!

Pinterest Two-fer ~ Crescent Roll Taco Braid & Pink Grapefruit Margaritas

Pinterest and I broke up for a bit.

It was too difficult during Lent.

All the sweets and desserts……

However, I am at a standstill with meals and needing to channel some healthier options and am asking Pinterest to go steady again.

NOT that this post is about healthy options ~ one step at a time!

I guess this Crescent Roll Taco Braid could possibly be skinny-fied, but this time around I used ground beef and full fat cheese. I did use one reduced fat crescent roll and one regular. This recipe makes 2 big braids…perfect for leftovers and lunches during the week. I have NO idea how one would fit a pound of ground beef, a can of black beans, a can of Rotel and 2 cups shredded cheese into ONE crescent roll tube as the recipe suggests.

taco1

{followed directions, but used two tubes of crescent rolls}

taco2

{garnish with lettuce, chopped tomatoes, light sour cream, avo/guac & a shot of Cholula : other possible toppings : jalapeños, cilantro, salsa and/or olives}

To wash it all down, I stirred up some Pink Grapefruit Margaritas. It is Spring Break after all…

taco3

I totally stopped reading the recipe and didn’t realize these were supposed to be blended. Whoopsie.

Here is what I had pinned…

taco4

{via}

*****

The taco braid was delish! I left it in the oven a tad longer than 25 minutes to get nice and crisp, but not too overcooked. I doused mine in Cholula, of course, and used an Ortega chipotle taco seasoning packet for some more heat. For the Rotel, I used the lime & cilantro variety. I’ll definitely be making this again and next time will use ground turkey and lowfat cheese on the reduced fat crescent roll to cut fat & calories a bit.

The margs were perfect, too. Not too sweet, not too tart and a pretty shade of pink that would be perfect for a bridal shower or bachelorette party.

Or a Friday night on Spring Break.

Linking up with Jess over at Keeping up with the Johnsons…come say “Hi!” and click around to discover all sorts of Pinterest action!

New Gadget

We needed another kitchen gadget/appliance like we need a hole in the head, but after several IG donut posts featuring perfectly round mini glazed donuts topped off with sprinkles, {the Easter Bunny} thought it’d be fun to skip the donut shoppe and make our own on Saturday and/or Sunday mornings!

You, too, can craft homemade circles of love with a quick trip to your local Target…

donuts3

This Sunbeam Donut Maker was on clearance for 50% off last week for just $15. It gets fabulous reviews as seen here.

The basic batter is surprisingly easy to prepare and I happened to have everything on-hand including the glaze ingredients {just powdered sugar & milk}.

donuts1

From what I understand, just about any muffin {not cake} mix will work here. I’ve heard rumors from this girl that you can make cinnamon toast crunch donuts with this mix…

donuts5

Yes, please.

Since we’re on Spring Break, we may have fired this baby up once or twice to experiment…

donuts4

The opportunities are endless with these things. It comes with a few recipes in the manual, but any thicker muffin-type batter would work.

I’m thinking blueberry donuts with a lemon glaze.

Or a simple cinnamon sugar.

Pumpkin for the Fall or gingerbread for the holidays.

Please stop me.

donuts2

Just don’t forget your coffee to go alongside.

Happy Spring Break….or what’s left of it!

XOXO

Snack On This

Holden’s party is just 3 days away and I’m doing as much as I can now to alleviate stress and extra running around in the next couple days. The fact that the party is NOT at our house helps A LOT!

But, there are still little things that need to be done like packaging party favors, picking up plates and napkins and adding a little something extra to plain water bottles.

 The party is mid-afternoon so I figured a light snack along with cake & ice cream would be enough. Elliott had her 6th birthday party at a local state park and the guests created their own trail mix. They really seemed to enjoy it, but it meant packing and hauling lots of extra containers to hold all the items. I decided this time around to pre-make the mix and serve it out of big glass canisters with a huge serving spoon.

: Safari Snack Mix :

snackmix

This is the perfect thing to toss together to feed a crowd and can be tailored to easily fit with any theme.

Here is what I used…

2-6.75 ounce boxes of Annie’s Ginger Snap Bunny Cookies

2-12 ounce bags of Jungle Animal Cookies {same brand as the pink & white Circus ones}

1-16 ounce bag of Snyder’s pretzel twists

2-4.5 ounce bags yogurt raisins

2-5.5 bags dried pineapple

2-6 ounce bags banana chips

1-12 ounce carton Whoppers

1-11.8 ounce bag coconut m&m’s

2-3.1 ounce boxes of cupcake bites

1-10 ounce bag mini marshmallows

1-20 ounce jar of lightly salted peanuts {served in a separate container on the side in case of allergies}

I just mixed it up in two batches in a large bowl and divided into gallon ziploc bags to keep it fresh until party time!

There are so many other things that you could add and/or substitute into this mix…

Goldfish crackers {I’m not a big fan of the rainbow variety, but they would add lots of color to the mix}

Almonds, cashews or any other nut

Dried cranberries {or any dried fruit}

Any dry cereal {Fruit Loops, Lucky Charms, Cinnamon Toast Crunch, etc.}

Pirate’s Booty

Teddy Grahams

Cheez-its

Bits of granola

Caramel corn or popcorn

Milk Duds

Fritos or Cheetos

*****

Have fun creating your own sweet & salty combination!

Enjoy!

Kick Carbs To The Curb ~ Boursin Chive Meatballs w/ Cauliflower Puree & Marsala Mushrooms

My friend, Christi, over at Burlap And Basil posted a pic of this meal on Instagram and immediately followed it up with a blog post.

Rightfully so.

This meal is to-die-for and super low in carbs if you’re worried about that sort of thing. I’m not doing Paleo, by any means, but this meal certainly wasn’t lacking anything ~ flavorful and filling!

meatballs1

meatballs3

{I had never used this before, but it is sooooo good. Would be lovely on some crackers, too!}


BOURSIN CHIVE MEATBALLS, CAULIFLOWER PUREE & MARSALA MUSHROOMS


makes 20-28 meatballs, depending on size
makes 4 servings of cauliflower puree
makes 4 servings of mushrooms

Ingredients
for the Boursin Chive Meatballs 

  • 1 to 1 1/4 pounds 85%-90% lean ground beef
  • 3/4 of one 5.2 ounce package of garlic and herb Boursin cheese
  • 1/4 cup chopped chives
  • 1 shallot, chopped
  • pinch of kosher salt
  • pinch of pepper
  • 1 tsp olive oil
  • Olive oil cooking spray

for the Cauliflower Puree

  • 2 pounds of cauliflower florets (I buy the bags at Trader Joe’s)
  • 1/4 of one 5.2 ounce package of garlic and herb Boursin cheese
  • generous grating of Parmigiano-Reggiano (maybe 3 tablespoons)
  • pinch of kosher salt
  • pinch of pepper

for the Marsala Mushrooms

  • 6 ounces of white or cremini mushrooms, stems removed and sliced
  • 1 teaspoon olive oil
  • pinch of kosher salt
  • pinch of pepper
  • pinch of crushed garlic
  • 4 tablespoons Marsala wine

serving option
serve with chopped Italian Parsley


Directions for the entire meal

  1. Preheat oven to 350 degrees.
  2. In a bowl, combine ground beef, Boursin cheese, chives, shallot, salt and pepper. With your hands, mix until combined, but don’t overmix or squeeze meat. You want to keep the integrity of the ground beef and just mix the ingredients into the meat.
  3. Roll 1 1/2 inch or so balls from the meat mixture and set onto a plate.
  4. Using a non-stick pan, heat olive oil and spray pan with olive oil cooking spray.
  5. Pull out a baking sheet and spray with cooking spray.
  6. Put a pot of water on the stove to boil – large enough to hold the cauliflower.
  7. In two or three batches, fry the meatballs until they are brown on all sides, but not cooked all the way through. You’ll turn the meatballs a few times to get them brown on all the sides. Place the meatballs onto the cookie sheet. Do not drain fat and juices from the non-stick pan.
  8. Once all the meatballs are browned on the outside and on the cookie sheet, put the cookie sheet into the oven and cook for about 20 minutes.
  9. While the meatballs are baking, toss the cauliflower into the boiling water and cook until tender – about 10 minutes.
  10. While the cauliflower is cooking, heat the fat and juices from browning the meatballs and add the olive oil. Add the sliced mushrooms, salt, pepper, garlic and Marsala wine into the pan. Mix to combine and let sautee and juices reduce completely – will take about 10 minutes. Stir periodically when it reduces.
  11. Drain the cauliflower and in batches, puree the cauliflower in your food processor (I use a mini one most often, so batches is how I get it smooth). Put the pureed cauliflower back into the pot you boiled the cauliflower in (and drained the water from already). Add the remainder of the Boursin cheese (1/4 of the package), Parmigiano-Reggiano, a pinch of kosher salt and pinch of pepper. Over very low heat, mix to combine and melt cheese. You can leave this on very low heat for about 15 minutes, as long as you stir frequently so it doesn’t burn to the bottom.
  12. Remove the meatballs from the oven.
  13. It is time to plate and eat! Onto the center of the plate, scoop a generous helping of pureed cauliflower. Place several meatballs onto the cauliflower. Top with Marsala mushrooms. Sprinkle some chopped Italian Parsley onto, if desired.

Cook’s Notes

  • To only make the meatballs, follow steps 1-5, 7-8 and 12.
  • To only make the cauliflower, follow steps 6, 9 and 11.
  • To only make the Marsala mushrooms, follow step 10. You might need 2 teaspoons of olive oil if you aren’t using the liquid from browning the meatballs, but it isn’t necessary since you aren’t browning the meatballs.

This pairing would make a perfect Valentine’s Day dinner…..just sayin’!

meatballs2

We sipped a new variety of Blue Moon that, I thought, went nicely with these dishes…
meatballs4
{Blue Moon Valencia Grove Amber}
First class food all they way ~ thanks for sharing, Christi!
Check out her sweet blog for many more gorgeous, mouth-watering food posts.

Don’t Be Without In N Out ~ DIY Double Double, Animal Style

Have you never experienced an In N Out love affair? Or know the goodness that is INO, but moved to a place where the big yellow arrow doesn’t exist?

You can replicate their famous burger in your own kitchen and you know what? It comes darn close to the real thing….almost like you were sitting in a booth wearing an INO paper hat and eating it out of the little red tray with some of their crispy, natural fries on the side.

burger2

Jay came across this recipe on Flickr and casually forwarded it to me. I immediately put it on the 3-day weekend menu plan.

Ingredients

serves two 1/4-pound burgers

  • 1/2 pound fresh beef chuck with plenty of fat, cut into 1-inch cubes {I just used 1 pound 85% ground beef. I was NOT trying to grind or process my own meat ~ read steps 1-4 below!}
  • 2 teaspoons vegetable oil, divided
  • 1 large onion, finely chopped (about 1 1/2 cups)
  • Kosher salt
  • 2 tablespoons plus 2 teaspoons mayonnaise
  • 1 tablespoon ketchup
  • 2 teaspoons sweet pickle relish
  • 1/2 teaspoon sugar
  • 1/2 teaspoon distilled white vinegar
  • 2 soft Hamburger buns, preferably Arnold brand {I used plain ol Ralphs hamburger buns}
  • Freshly ground black pepper
  • 8 dill pickles chips
  • 2 quarter-inch-thick slices ripe tomato
  • 2 leaves fresh iceberg lettuce, white core section removed, torn to bun-sized pieces
  • 1/4 cup yellow mustard
  • 4 slices deli-cut American Cheese

Procedures {Note: Instead of steps 1, 2, 3 & 4, I just used 1 pound of ground beef and formed 8 thin patties like it says in step 8}

  1. If using a meat grinder: Place feed shaft, blade, and 1/4-inch die of meat grinder in freezer until well-chilled. Meanwhile, place meat chunks on rimmed baking sheet, leaving space between each piece and place in freezer for 10 minutes until meat is firm.
  2. Combine meat in large bowl and toss to combine. Grind meat and refrigerate immediately until ready for use. Handle as gently as possible. Proceed with step three below.
  3. If using a food processor: Place bowl and blade of food processor in freezer until well-chilled. Meanwhile, place meat chunks on rimmed baking sheet, leaving space between each piece, and place in freezer for 10 minutes until meat is firm, but not frozen.
  4. Combine meat in large bowl and toss to combine. Working in two batches, place meat cubes in food processor and pulse until medium-fine grind is achieved, about 8 to 10 one-second pulses, scraping down processor bowl as necessary. Refrigerate ground meat immediately until ready for use. Handle as gently as possible.
  5. Heat 1 teaspoon oil in a 10-inch non-stick skillet over medium-high heat until shimmering. Add onions and 1/2 teaspoon salt to skillet. Reduce heat to medium low, and cook, tossing and stirring occasionally until onions are well browned, about 15 minutes. Once onions begin to sizzle heavily and appear dry, add 1 tablespoon water to skillet and stir. Continue cooking until water evaporates and onions start sizzling again. Repeat process, adding 1 tablespoon of water with each iteration until onions are meltingly soft and dark brown, about 3 times total. Transfer to a small bowl and set aside.
  6. Make the sauce: Combine mayonnaise, ketchup, relish, sugar, and vinegar in small bowl. Stir to combine.
  7. Place closed buns in preheated oven for 2 minutes until slightly darkened and crisped. Heat 1/2 teaspoon oil in 12-inch non-stick skillet or griddle over medium-high heat until shimmering. Open buns and add face-down to skillet. Toast until dark brown around the edges, about 1 minute total. {I just lightly toasted the buns}
  8. Form ground beef into four 2-ounce patties, using damp hands to press each into a patty about 3/16ths of an inch thick and 4 inches wide. Season generously with salt and pepper. Add remaining 1/2 teaspoon oil to pan, swirl to coat, and heat over medium-high heat until lightly smoking. Add burger patties and cook without moving until well browned and crusty on first side, about 2 1/2 minutes. While they are cooking, spread 1 tablespoon mustard on raw side of each patty with a spoon. Meanwhile, top each bottom bun with up half of spread, 4 slices pickles, 1 slice tomato, and lettuce. Flip patties with a thin spatula so mustard side is down and continue to cook for 1 minute. Top each patty with a slice of cheese. Divide onion mixture evenly between two patties. Place the other two patties directly on top of the onions, sandwiching them between the beef. Transfer patty stacks to bottom bun. Top with top bun, and serve immediately.

burger1

I have to say that it came real close to the real thing…my bun got all gooey from the sauce and I had tomato and grilled onions falling all over the place!

I roasted up some sweet potato slices to go with.

The only time consuming part was maybe caramelizing the onions ~ took about 20 minutes.

This recipe certainly won’t stop us from going to In N Out, but it was fun to try and see how they compared to everyone’s favorite burger.

Enjoy!

burger4

*****

And we certainly can’t forget this picture from under the criss-crossed palm trees…

burger3

{Kapri & Holden ~ October ’12}

Peppermint Dreams

Hello!

Is all your holiday baking done, packaged up all pretty and ready to be delivered?

We still owe some of the special people in our lives some sweet goodies so we’ll be cranking out more confections and delivering them until the eleventh hour, that’s for sure.

Earlier this week I made some Peppermint Sugar Cookie Bars for the teachers, office staff and yard duties {if there is a newer more politically correct term, please share…I feel like [yard duty] is the equivalent of [stewardess] which we now call flight attendants}.

I packaged them up as the {nice} counterpart to the {naughty} Oreo lumps of coal.

It’s no secret that over this year I have made several batches of sugar cookie bars. I did make the pumpkin spice version this Fall and was underwhelmed. BUT, this festive candy cane version with peppermint buttercream is to-die-for.


Peppermint Sugar Cookie Bars


{via The Busty Baker}

sugarcookie

Cookies:
1 cup (2 sticks) unsalted butter, room temperature
2 cups granulated sugar
4 large eggs
2 teaspoons vanilla extract
5 cups all purpose flour
1 teaspoon salt
½ teaspoon baking soda
1 cup crushed or chopped after-dinner butter mints {used Ralphs brand and only included the white, pink and green ones in the batter ~ sorry yellow!}

Frosting:
1 cup (2 sticks) unsalted butter, room temperature
½ teaspoon peppermint extract
Pinch of salt
4 cups confectioners’ sugar
2 to 4 tablespoons milk
Food coloring, if desired {I used just 2 drops of red}
½ cup crushed peppermints or candy canes {processed in my Cuisinart}

1. Preheat oven to 375F. Grease a large 11X17-inch rimmed baking sheet. Line with parchment paper and grease paper as well; set aside. {I just used a flat cookie sheet lined with parchment paper}
2. In a medium bowl, whisk together flour, salt, and baking soda.
3. In the bowl of an electric mixer, cream butter and sugar until light and fluffy, about 3 minutes. Add eggs, one at a time, mixing well after each addition. Add in vanilla. Add in flour mixture, mixing until just combined. Stir in butter mints.
4. Spread batter evenly onto prepared baking sheet, smoothing top. Bake until light golden brown and a toothpick inserted in the center comes out clean, about 20 to 25 minutes. {I baked mine for 18 minutes, turned off the oven and left them in for 2  more minutes. You don’t want to overcook these…they get too dry, in my opinion} Transfer to wire rack to cool completely.
5. While cookie is cooling, make frosting; in the bowl of an electric mixer, beat butter until fluffy, about 3 minutes. Add peppermint extract and salt. Add confectioners’ sugar, a little at a time, beating until well combined. Add milk, a tablespoon at a time, until frosting is smooth and fluffy. Add a few drops of food coloring if desired.
6. Spread frosting over cooled cookie, sprinkle with crushed peppermints, then cut into bars. {I like to cut them into triangles}

*****

If you like all things peppermint, you NEED to make these. I love the pastel colored mints running through the bars…not to mention the light pink buttercream peppered with crushed candy canes!

You will dream about these….

Promise.

Thanksgiving Leftovers

Turkey Day came and went and this morning I packed up the last of the dark meat and mashed potatoes & gravy for Jay’s lunch.

We hosted this year and were grateful that everyone came to us. Our long holiday weekend was filled with adventures and now we’re back to our normally scheduled routine with soccer practices, homework, religious ed classes and dance this week.

Here are a few bits and pieces of the last several days…

{simple decorations ~ a clearance vase from Target and a branch & pinecones from my morning hikes}

{kosher, Pioneer Woman brined bird on the grill}

{centerpiece from our backyard}

{our feast ~ 1. turkey {before cranberry orange relish!} 2. candied yams 3. cornbread stuffing 4. Ina’s parmesan mashed potatoes {before gravy!} 5. green bean casserole 6. maple glazed carrots ~ yum! desserts not pictured ~ sweet potato pie and Grunc’s pear ginger upside down cake}

{Black Friday CB&TL date}

{Saturday lunch at Irv’s}

{gingerbread house at The Grove}

{Sunday tree shopping}

{…and trimming}

{Sunday supper ~ crock pot beef stew}

*****

It was a treat to have my dad {Popsi} here from Seattle, my mom {Gramma} here from San Diego and Grunc {great uncle Larry} and Auntie Jill here from Yosemite/Marin County. We all joined together to get the food on the table and consequently ate too much! Now all that’s leftover are happy memories of Thanksgiving 2012…

…and I’ll take those leftovers over a turkey sandwich with cranberry sauce any day!